How to access to the Load Board
Visualization of the Load Board
Load ID (Hot Load / After hours follow up)
How to customize Layout Fields
Introduction to Excluding Filters
How to create Smart Filters on my Load Board
Download reports from the Load Board
Introduction to Load Board
What is the Load Board
Load Board is a tool for visualizing and controlling all the existing loads in the system more efficiently.
How to access to the Load Board
The Load Board can be accessed by clicking on the Freight button on the menu of the left, and then clicking on Load Board.
What is the Load Board for
The Load Board has a list of all the existing segments in our system for its consultation and management.
Its layout allows us to easily and efficiently consult and manage the information of all the system's shipments with just one click: from opening a particular segment, to accessing to the carrier or the client, having a quick overview of all the details of the load, visualizing the comments history, opening the tracking link, etc.
Visualization of the Load Board
We could summarize the visualization of the Load Board in 4 main areas:
LIST OF LOADS (red box), where the list of shipments that comply with the applied requirements/filters appears.
LOAD DETAILS (purple box), where we can see the details of a specific shipment when selecting or hovering the mouse over it.
SMART FILTERS (orange box), where each user can navigate through the tabs of their saved smart filters.
FILTERS AND SEARCHES (purple arrows), where requirements or identifiers are entered to perform searches.
It should be clarified that, depending on the role of the employee, some options or others are available.
List of Loads
The list of loads shows a summary of the shipments that comply with the applied filters, with the following columns of summarized information:
Load ID (Hot Load / After hours follow up)
El Load ID is the unique identifier of the shipment inside the system, and it's made up by 5 digits. After the 5 digits a hyphen "-" is written to define the segments that correspond to that load in general. (1, 2, 3, etc.) *The Load ID works as a hyperlink, you can click over it to access to the shipment.
The marks next to the ID show if the load has the Hot Load check selected (red/blue flag), and/or the After hours follow-up (red/blue alarm).
Status
Indicates the currrent load status.
Pickup - Pickup Location
Hour and Date of the shipment pickup. Along with the place where the pickup will take place.
Delivery - Delivery Location
Hour and Date of the shipment delivery. Along with the place where the delivery will take place.
Customer (Shipper)
Name of the Customer / Shipper who owns the goods.
Carrier
Name of the Carrier who is responsible of transporting the goods.
Load Details & Layout Fields
Layout Fields refers to all the fields shown when clicking over a load.
These can be personalized / customized to give priority to the shipment information that matters the most to us to consult in our daily work.
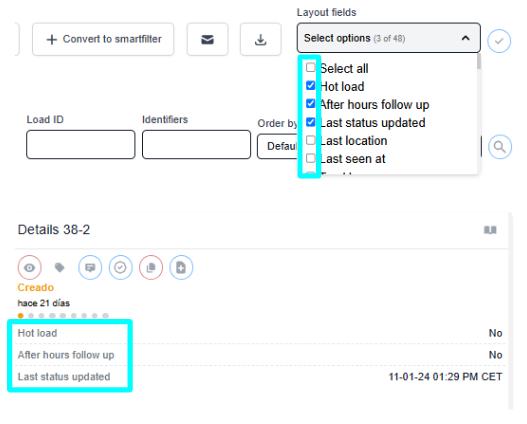
How to customize Layout Fields
To telect the Layout Fields we need to see in each load, we click on the drop-down list that says Layout Fields on the top-right corner.
In this list we can select all the shipment details that are shown (on the right, in the details section).
It's just a matter of selecting the fields that we want to be shown, and the clicking on the check to apply the filter.
If you select the option of select all, all the possible fields will be shown.
Afterwards, we can see that the shipment details only include the fields we selected from the list.
Filters - Parameters
Filters can be used to look for loads with determined characteristics.
A load´s filters can be made according to fields related to its General Information, Pickup / Dropoff, Shipper, Carrier, etc.
For that, we select the Filters button.
General Filters
We can filter by Status according to the general information of the load:
- Sales status
- Ship type
- If they are live offers or not
- Status of the load
- Tracking source, etc.
Drop off / Pick up Filters
It can also be filtered by the drop off and pick up status of the load:
- Origin
- Countries of Origin
- Destination
- Countries of Destination
- Pickup and delivery dates
- Miles, etc
Shipper
We can filter by status according to the Shipper information:
- Ops manager
- Sale manager
- Sales main
- Shipper, etc.
Carrier
And/or we can filter by the status according to the Carrier information:
- Target (Marketplace)
- Equipment (inventory)
- Carriers
Introduction to Excluding Filters
It refers to all the filters we can exclude from the search, in order to make a filter of EVERYTHING except X (meaning Carrier, Shipper, etc.).
How to use Excluding Filters
To make and excluding filter (everything but xxx shippers/carriers I want to exclude), we will change to an excluding filter.
By default, the Load Board offers the filter in an including way = SHIPPER INCLUDE.
We click on the blus message of EXCLUDE SHIPPERS, and that will change it to an excluding filter.
When clicking, we see how it changes in the box to SHIPPERS EXCLUDE.
We select from the drop-down the carriers/shippers we want to exclude.
In this example, we see how we have selected 2 shippers (1 - Aguascalientes Mercancías y 3 - Balam Mercancías), and the text of the drop-down shows SHIPPERS EXCLUDE 2 OF 4.
As always, we click on the blue check to conform the selection and Save to save.
Applying / Filter tags
All these filters are stackable, you can search based on all the filters as long as there are matching loads in the system.
Once we select all the filters we want to observe in the loads, we click on the Search button.
Smart Filters
Introduction to Smart Filters
Smart Filters are groups of personalized filters that can be named and assigned according to the user´s liking.
There can be several Smart Filters generated by account, and they help achieve a better organization of the Load Board when visualizing the loads.
How to create Smart Filters on my Load Board
To create a Smart Filter, first we will make a MANUAL FILTER with the information needed, and afterwards we click on the Convert to Smart Filter button.
**The filters we have applied in the manual filters will be the ones remaining when making a Smart Filter, therefore the "Convert".
In the same way, we can edit the filters we want to apply in the Smart Filter when creating it.
The required field will be naming it.
Once we make sure all the filters are correct, we click on Save.
This will display our Smart Filter Statically in a column. This wont't change until we decide to Update/Edit the Smart Filter, or else, Delete the Smart Filter.
Reports
In the Load Board tool it is possible to generate Excel files that correspond to what we see in the Load Board once we apply the filter we need.
We have the option to make a direct download. or receive the Excel in our E-mail.
Download reports from the Load Board
To generate the Excel report through a download, it is necessary to filter in the Load Board the loads we want to see in the report. And clicking on the download button.
Afterwards, it will be automatically downloaded in your computer in an Excel file.
Sending reports to an e-mail
To generate the Excel report through an e-mail, it is necessary to filter on the Load Board the loads we want to see on the report and click on the E-mail button.
Afterwards, you will receive an e-mail on the primary inbox with an attached Excel file.